Dropping Pan And Flushing Transmission
By skjos
2002 4runner SR5 4WD, A340F Transmission
Date: 2/9/09
Parts
OEM FIPG (P/N 00295-01281) or Permatex "The Right Stuff"
OEM Transmission Filter (P/N 35330-60030) Note: the specific filter/strainer for your vehicle may be different
Drain Bolt Crush Washer (P/N 35178-30010)
Tools and Supplies
White Five-Gallon Bucket
Metric Socket Set
3/8" Drive Ratchet
3/8" Drive Torque Wrench (in/lbs)
6" Socket Extension
10mm Socket Screw Driver
1 1/4" Metal Putty Knife
Small Dead-Blow Hammer
Plastic Putty Knives
Safety Glasses
Non-Residue Cleaner (acetone, brake cleaner)
White Paint Marker
Foam Q-Tips
3/8" Diameter Fuel Line
Approximately (16) Quarts of Dextron III or Equivalent ATF
Summary
The following steps document the procedure I used to drop my pan and perform a flush of my transmission. There may be a better way to perform this task, and I'm open to suggestions, but this method should get the job done.
If you are only planning to flush the transmission without dropping the pan, you just need to follow steps: 1, 2, 3 (only remove (2) front skid plates), 6 (ignore option), and 36 thru 44.
Please follow these steps at your own discretion, I am not liable for any damage you may do to yourself or your vehicle. It sucks that I have to say that, but I need to cover my hide.
Step
1: Make A Five-Gallon Graduated Bucket
Mark a five-gallon bucket (preferably white) with graduated lines at every quart. This can be done by filling the bucket with (1) quart of water at a time and scratching the level with a knife, go ahead and mark it for (20) quarts. Pour the water out and dry the bucket, retrace the scratches with a permanent marker and label them 1 through 20. This will help you determine how much fluid you drain out, which you will need to know when you fill it back up.
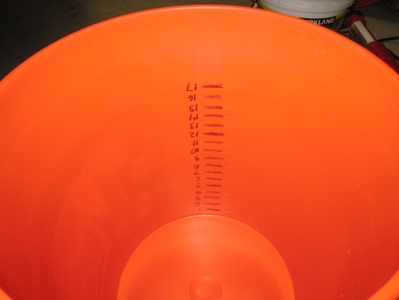 |
| Graduated Five-Gallon Bucket |
Step
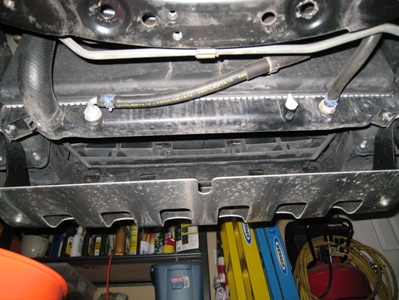
2: Jack-up your rig for clearance (skip this step if you are running 285’s)
Drive your front wheels onto ramps and then jack you back end up until the frame rails are level. Install jack stands under the rear axle.
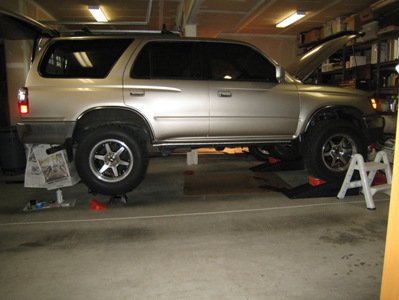 |
| Frame Rails Level & Room For Creeper |
Step
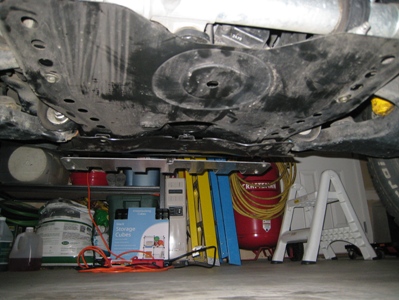
3: Remove The (2) Front Skid Plates And (1) Side Skid Plate
Only the very front skid plate actually needs to be removed to gain access to the transmission cooler line, but in order to remove the front skid plate, the back skid plate has to come off. As far as the side skid plate, you may be able to work around it, but by removing it you get better access to the side of the transmission pan which is important when you’re trying to break the seal around the pan.
 |
 |
|
| Front Skid Plates | Side Skid Plate |
Step
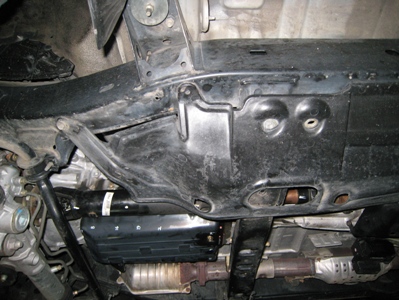
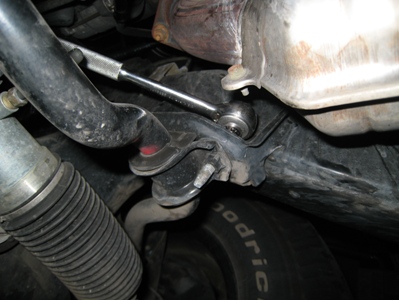
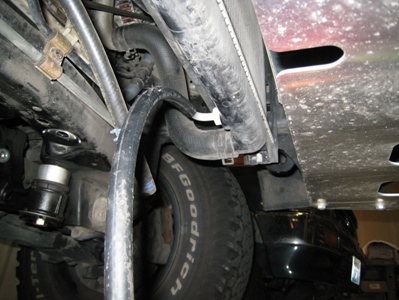
4: Remove The Sway Bar Brackets
Remove the (2) sway bar brackets; by disconnecting the sway bar at these points you will gain the maximum amount of room for removing and reinstalling the pan. You may be able to get the pan out with the sway bar in place, but believe me you will not be able to get it back in without messing up the FIPG seal on the sway bar.
Option: If you find removing the sway bar brackets difficult, you can also get the sway bar out of the way by disconnecting the sway bar end-links, this will allow you to pivot the back side of the sway bar down and out of the way.
 |
||
| Remove Sway Bar Brackets | The Sway Bar Is Now Out Of The Way |
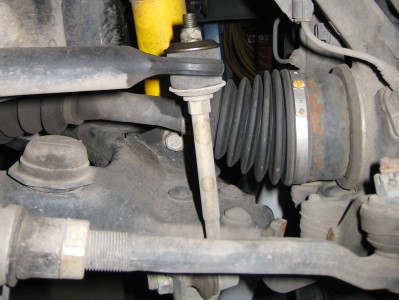 |
| Sway Bar End-Link(s) |
Step
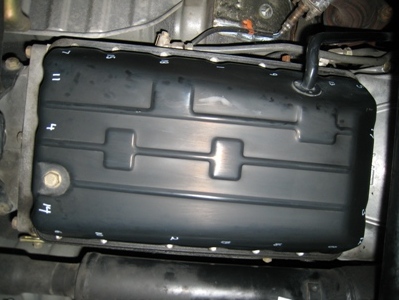
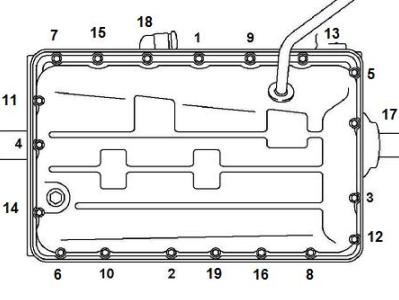
5: Clean The Exterior Of The Pan And Mark Torque Sequence
Clean the bottom exterior of the pan and mark the torque sequence on the pan; this will help keep things straight when you are reinstalling the pan. Don’t skip this step; it will help when you are rushing to torque down the bolts.
 |
 |
|
| Marked Up Pan | Torque Sequence |
Step
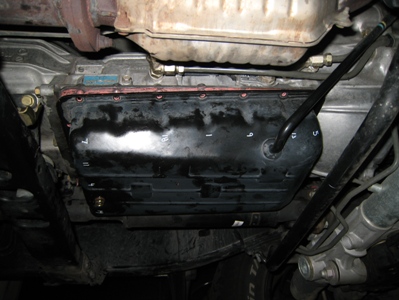
6: Remove The Dipstick And Drain The Pan
Remove the transmission dip stick and put your five gallon bucket under the pan. Remove the drain bolt and let the pan drain. Once drained, put the drain bolt back in finger tight.
Option: You can remove the upper dipstick tube at this time (see step 13 for joint description). Remove the bolt that holds it in place, then twist the upper tube back and forth while pushing it up out of the lower tube (make sure the dipstick is out first).
 |
| Upper Dipstick Tube Bolt |
Step
7: Remove (19) Pan Bolts
Remove the (19) pan bolts; these should come out pretty easy because the torque level is relatively low. I pulled them out based on the torque sequence and kept them in order so the bolt that came out of the hole was the bolt that was going back into the hole. You will need a 6" ratchet extension to get at them all.
Step
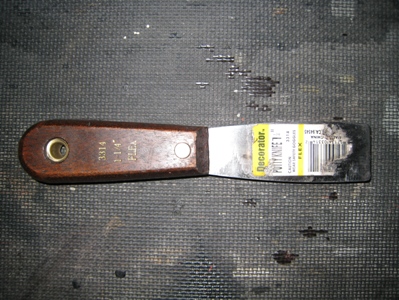
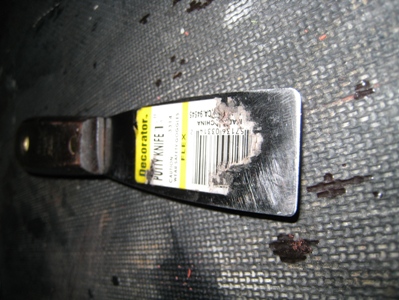
8: Make A Seal Cutter
If you are lucky enough to have the Toyota SST 09032-00100 (seal cutter) this might be easy, but without it, a putty knife is your next best option. I used a 1 1/4" wide metal putty knife, with the smallest sheet thickness I could find. I modified the putty knife with a file to round the corners to help prevent scratching the aluminum seal surface; and I sharpened the front edge, not to a knife edge, but just enough to take the square edges off.
 |
 |
|
| Putty Knife/Seal Cutter | Rounded Corners & Filed Edges |
Step
9: Cut The Pan Seal (Easier Said Than Done)
The place where I had the best luck at breaking the seal was on the driver’s side of the pan. With the side skid plate removed you can get a pretty straight shot to the seal (above the front driveline) and have room for a small dead blow hammer to help you get the putty knife through the seal. I went at the seal at a 45 degree angle and rapped on the back of the putty knife until it pierced all the way through the seal. Once you have a good start you can work the putty knife around, don’t go too deep, just the width of the pan's seal surface. When cutting the seal do the sides and back first, leave the front portion of the seal attached.
 |
| Cutting Seal Around The Pan |
Step
10: Drain Remaining Fluid From The Pan
Now that you have most of the seal removed, you can lower the back of the pan an inch or so to get the remaining fluid towards the drain bolt. Get your five gallon bucket back underneath the pan and remove the drain bolt to drain out the additional fluid. Reinstall the drain bolt again finger tight.
 |
| Tilting The Pan Helps Get Out More Fluid |
Step
11: Complete The Seal Cutting
Cut the remaining seal in the front of the pan and prepare to remove it.
Step
12: Verify The Dipstick Is Removed
Make sure the dipstick is still removed; it has a nasty habit of reinserting itself.
Step
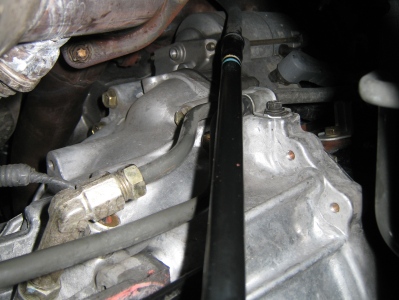
13: Disconnect The Pan
You'll notice that even with the seal cut, the pan is still attached at the dipstick tube; this is a slip fit joint that has an O-ring on the upper segment of the tube. To get the pan dislodged from this joint, you will have to do a lot of twisting. This is what I found worked: get one hand up to the joint and provide some downward pressure on the part of the tube that is connected to the pan. Now rotate the pan back and forth, it won't turn too far, but enough to get some twisting movement at the tube joint. Keep doing the rotating of the pan with one hand and the downward force with the other, it won't happen quickly, but eventually the joint will slowly separate and the pan will be completely unconnected.
 |
| Dipstick Joint That Needs Seperated |
Step
14: Remove The Pan
Now get the pan out from underneath the rig, without tilting it so you don't spill the remaining fluid in the pan. Dump the pan fluid into the five-gallon bucket, and then move the bucket under the rig to catch all the fluid dripping from the valve body.
 |
| Pan After Removal and Fluid Dumped Out |
Step
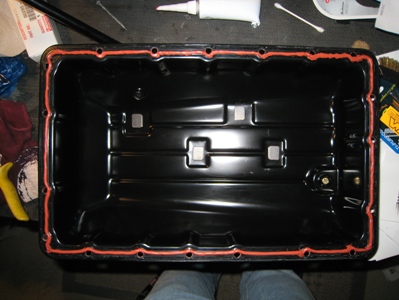
15: Inspect Magnets And Clean Pan
Inspect the magnets in the pan, they likely have what looks like sludge on them which is normal, but if you see metal shavings on them you may have a transmission that is on its way out. Remove the magnets and clean all the oil out of the pan. Clean the sludge from the magnets.
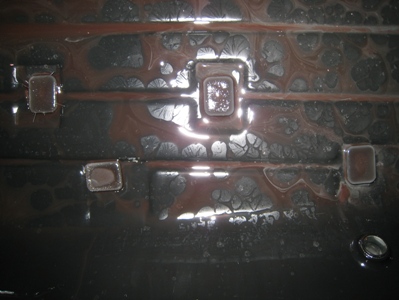 |
| The Left-Most Magnet Has A Few Metal Slivers, Not Good |
Step
16: Remove FIPG Seal From Pan
Remove all the old FIPG (formed in place gasket) seal from the pan. I used a plastic putty knife to do this, it took a long time and lots of patience. There are probably much quicker ways, but I didn't want to scratch the pan.
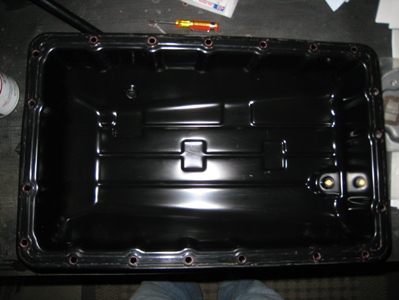 |
| Cleaned Pan, Nice & Shiney |
Step
17: Inspect Joint Surface On Pan
Even with being very careful when cutting the seal, I put a few small nicks in the pan. To keep these from interfering with the good seal surface, I took a medium-fine sharpening stone and smoothed them flush with the seal surface.
Step
18: Remove FIPG Seal From Transmission Body
Remove the old FIPG seal from the transmission body interface; wear safety glasses – there will be a lot of seal chunks dropping on your face. I removed the seal with a plastic putty knife; again there could be quicker ways of doing this. Removing the FIPG can be done before or after removing the filter, I did it before, but it is up to you.
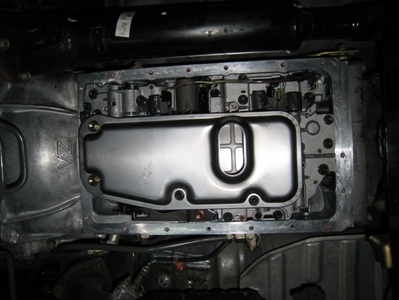 |
||
| Seal On The Transmission Body | Seal Removed |
Step
19: Inspect Joint Surface On Transmission Body
I had some old scratches in this joint; they must have been there from the first time the pan was removed by the previous owner. I used my sharpening stone again to get the scratches flush with the rest of the seal surface.
Step
20: Remove The Transmission Filter
There are four bolts holding the filter in place, these bolts are different lengths so keep track of where they are removed from. There is a lot of oil in the filter, so have your bucket underneath it during removal. Remove the (4) bolts and lower the filter from the valve body, dump out the fluid into your bucket.
Note: As soon as you loosen the filter bolts, ATF will start flow out of the inlet hole. Make sure you are not underneath it.
| Filter Removed |
Step
21: Inspect And Clean The Filter
Inspect the inlet/outlet ports to see what type of crap has collected in the filter, if there are chunks you may have a transmission problem. This filter can be reused, but I chose to replace it. If you intend to reuse it, clean it with brake cleaner shooting the cleaner from the (3) upper ports and letting the crap caught in the filter to drain out the bottom port. Once satisfied with the cleanliness from the upper port side, blast from the lower port and see if you can get any additional gunk to come out.
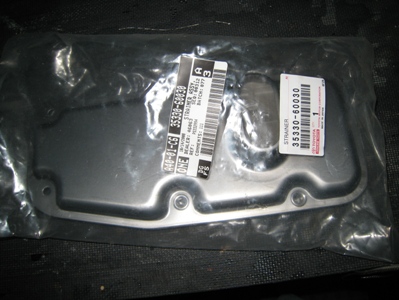 |
| New Filter |
Step
22: Clean The Valve Body
With the filter removed clean all the bits of FIPG that may have gotten stuck to the valve body, take your time and get them all. A foam type q-tip can be a big help, don't use the cotton type, cotton fibers like to come off and stick to the valve body.
Step
23: Clean The Transmission Body Joint Surface
Now that all the FIPG chunks are removed, go ahead and clean the seal surface with a non-residue cleaner, I used acetone.
Step
24: Re-Install Transmission Filter
Verify all three cork gaskets are attached to the filter, then install the new or cleaned filter back in its place, put the bolts in the same holes they were removed from and torque to 84in/lbs (this is inch/pounds, not foot/pounds). Don’t risk it, invest in an inch/pound torque wrench, you do not want to strip out these threads.
|
| New Filter Installed |
Step
25: Clean And Lube Dipstick Tube Joint
You are almost ready for seal, but first climb back under the rig and clean the dip stick joint with a rag, once it is clean put some new ATF fluid on the joint to lube it up for reinstall. While your under there, inspect the transmission body joint one more time and make sure it is still clean, if not clean it again with a non-residue cleaner.
Option: You can choose to take off the upper dipstick tube by removing the bolt that holds it in place, this way you don't have to worry about aligning the pan to the tube during reinstallation.
 |
| Cleaned & Lubed Dipstick Joint |
Step
26: Clean The (19) Pan Bolts
Clean the (19) pan bolts, you don't need to get all the seal off, but remove excessive globs and any dirt and oil that may be on the bolt. If you use a solvent on these bolts, make sure it doesn’t leave any residue (use brake cleaner).
Step
27: Stage Your Parts And Tools
Place the (19) bolts within arms reach when the pan goes back in. Also, get your torque wrench set to 40in/lbs (initial torque), and get your 10mm screw driver ready.
Step
28: Final Pan Cleaning And Magnet Installation
Remove any remaining FIPG chunks out with a rag and compressed air, also look into the dip stick tube and make sure it is clean. Put the magnets back into the bottom of the pan and clean the sealing surface with a non-residue cleaner, again I used acetone.
Step
29: Apply FIPG To Pan
Using Toyota FIPG or Permatex "The Right Stuff" FIPG, squeeze a bead of sealant around the pan, the bead is to be 2-3mm in diameter. When you come to a bolt hole, joggle the seal to the inside around the hole, not to the outside. You only have 15 minutes, so be quick, but also be careful.
 |
| 2-3mm FIPG Bead Around Pan |
Step
30: Raise Pan To Transmission Body
Bring the pan under the rig, and slowly raise it to the transmission body. Pay close attention to the frame cross beam, the front wheel drive shaft, and the new filter - these are very easy to hit when raising the pan. Do it slow and be careful. Once you've cleared most everything look up and make sure you got the dipstick tube aligned (unless you removed it in step 6 or step 25). Now go ahead and raise the pan to the transmission body, keep the bolt holes aligned and push the pan against the transmission.
Step
31: Install (19) Pan Bolts
Install the bolts according the sequence written on the pan, you don't need to torque them yet, just get them finger tight so they hold the pan in place, a 10mm socket screw driver is probably the best tool for this.
Step
32: Torque The (19) Pan Bolts
Now that you put your last bolt in, it's time to torque them, torque to an initial torque of 40in/lbs according to the sequence written on the pan. After torquing all (19), reset your torque wrench to the final torque of 65in/lbs and torque them again.
Step
33: Allow Seal To Cure
Allow the FIPG to cure, the Toyota stuff states 1-2 hours for engine start(?) and 15-16 hours for complete cure. I waited for complete cure, but you can probably put AFT back in after 2 hours. The Permatex "The Right Stuff" specifies that it can be put into service just 1 minute after the joints are assembled.
Step
34: Reinstall Sway Bar (While Seal Is Curing)
Reinstall the sway bar brackets, the nuts and bolts are to be torqued to 19ft/lbs, but you can't really get a torque wrench in there so it's best to just get them good-n-tight.
If you opted to disconnect the sway bar at the end-links, reinstall the nuts to a torque of 14ft/lbs.
Step
35: Reinstall Side Skid Plate (While Seal Is Curing)
Reinstall the side skid plate; these bolts should be torqued to 10ft/lbs (120in/lbs).
Step
35.5: Reinstall Upper Dipstick Tube (Option)
If you removed the upper dipstick tube (step 6 or step 25) to assist in removing/reinstalling the pan, now is the time to reinstall it, torque the bolt to 9ft/lbs.
Step
36: Refill Pan With ATF (After Seal Cure)
Once the seal is cured it’s time to refill with ATF, remove the drain bolt one last time and install a new crush washer, then reinstall the bolt, torque to 15ft/lbs. Insert a funnel into the dipstick hole; I used the funnel in funnel method to make sure I didn't spill ATF (a small funnel in the dipstick hole, a big funnel in the small funnel). Look at your five gallon bucket and determine how much ATF you drained. 6.5 quarts came out of my rig, but it was on jack stands for three days draining, so you might get less. Refill with the same amount you drained (assuming your level was correct when you started).
 |
| Small Funnel In Top Of Dipstick Tube |
Step
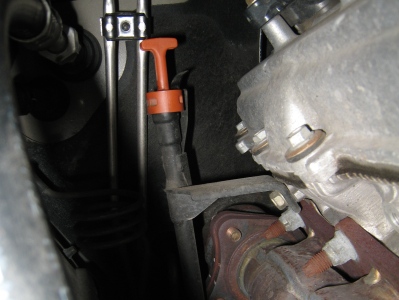
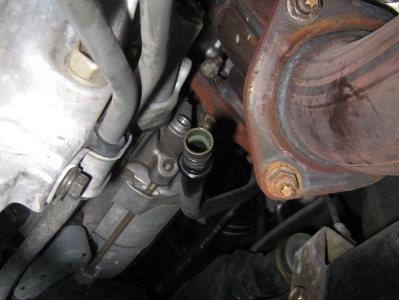
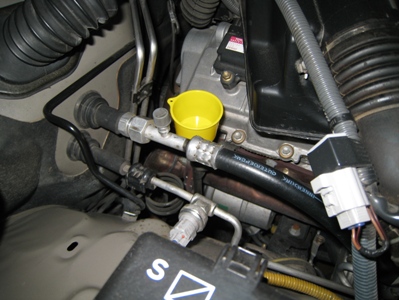
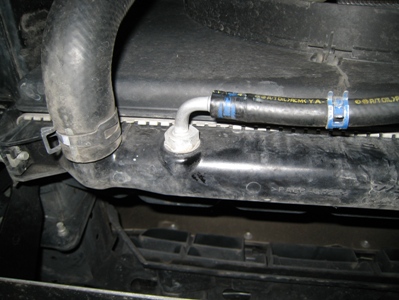
37: Remove Transmission Cooler Line
Get your bucket under the radiator and remove the clamp from the driver's side transmission line coming out of the radiator. Pull the hose from the radiator, a little bit of fluid will drain out into your bucket.
 |
 |
|
| Cooler Line Connected | Cooler Line Disconnected |
Step
38: Install A Drain Line
With the cooler line removed insert a 3/8” fuel line over the end of the hose joint coming out of the radiator and put the other end into your bucket.
 |
| 3/8" Drain Line Connected |
Step
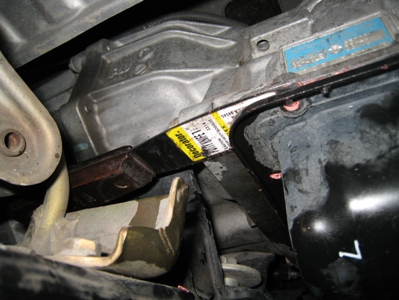
39: Flush The Transmission
This is a two man job; get a friend to perform the starting and stopping of the rig, while you monitor the amount of ATF coming out of the drain line. Start the rig, this will start the flow of ATF out of the hose at a rate of about (1) quart per 22 seconds. Let your bucket fill up (1) quart and then turn off the rig; you might be able to go (2) quarts, but I played it safe and went (1) quart at a time. Add a quart of fluid through the dipstick tube. Repeat this process until new ATF is coming out of the drain line, a white bucket will help you determine when the ATF color changes; my orange bucket didn't do so good. If you can't tell the color difference, just make sure you go through about (16) quarts of new fluid (refilling of the pan and the flush).
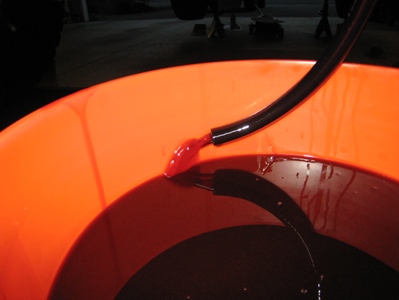 |
| Fluid Coming Out Of The Line When Engine Is Running |
Step
40: Remove The Drain Line And Reinstall Cooler Line
Remove the drain line you attached to the radiator, clean the tube joint and reinstall the cooler line. Put the clamp back in the same place you removed it from - try to align the indentions as best as possible.
 |
| Cooler Line Reconnected, Just Need To Move The Clamp Over |
Step
41: Check The Fluid Level
Remove the funnels and get your dipstick clean and ready (it doesn’t need to be installed). Start the rig, and with your foot on the brake, run through the gears P-R-N-D-2-1 and back 1-2-D-N-R-P stopping about 2 to 3 seconds in each gear. Keep your truck running, insert the dipstick, and measure the level. You should be in the "cool" range on the dipstick. If you are low add some more ATF, if you are high drain a little from the cooler line using the flush method.
Step
42: Reinstall The (2) Front Skid Plates
Reinstall the (2) front skid plates, torque the bolts to 10ft/lbs.
Step
43: Remove Jack Stands
Remove the jack stands from the back axle and drive the rig off the ramps.
Step
44: Test Drive And Level Check
Now take the rig for a nice 15 mile drive to get the new ATF up to temperature. Park on a level surface and run through the gears P-R-N-D-2-1 and back 1-2-D-N-R-P stopping about 2 to 3 seconds in each gear. Keep your truck running, insert the dip stick, and measure the level. You should be in the "hot" range on the dipstick. If you are low add some more ATF, if you are high drain a little from the cooler line using the flush method. Note: you may want to do the test drive before putting the skid plates back on, this will make it easier to remove fluid if necessary.
I hope this helps to de-mystify the whole dropping the pan and flush procedure. I would like to thank Mt Goat (Dale) and GSGALLANT for helping me out with my pan drop; and all of YotaTech for providing me with the information to get this job done.